OpenGL 与 3D精校教程
Three.js 实战技巧
汇集法线、UV、Raycaster、BatchedMesh、相机矩阵与曲线路径等高频三维问题。
对webgl的api进行封装,倾向于面向对象的方式使用
webgl是使用canvas开启3D
/**
   * 设置物体位置到某一点并使它的面朝向一个向量
   * @param mesh 网格
   * @param position 位置
   * @param Vec3 朝向的向量
   */
  static setMeshFaceVec3(mesh: THREE.Object3D, position: THREE.Vector3, Vec3: THREE.Vector3) {
    mesh.position.copy(position)
    //方法一
    // 然后,计算mesh的朝向。这里我们需要一个辅助向量来表示mesh的正面(通常是Y轴正方向)
    const front = new THREE.Vector3(0, 1, 0) // 默认正面朝向Y轴正方向
    // 接下来,我们需要计算一个辅助向量,它与法向量垂直,并且与mesh的正面(front)也垂直
    const side = new THREE.Vector3().crossVectors(Vec3, front).normalize()
    // 使用辅助向量来构建一个正交基,这样我们可以确保mesh的正面朝向法向量
    const up = new THREE.Vector3().crossVectors(side, Vec3).normalize()
    // 使用lookAt方法,传入目标点和up向量,来设置mesh的朝向
    mesh.lookAt(position.clone().add(up))

    // 方法二、
    const quaternion = new THREE.Quaternion().setFromUnitVectors(new THREE.Vector3(0, 1, 0), Vec3)
    // 使用这个四元数来旋转立方体,使其正面朝向目标点
    mesh.quaternion.multiplyQuaternions(quaternion, new THREE.Quaternion())
  }
获取面的法线
/**
   * 获取面的法线
   * @param mesh  目标网格
   * @param face  相交的面-如能获取,raycaster
   * @param faceIndex  面的索引 raycaster
   */
  static getNormal(mesh, face, faceIndex) {
    const geometry = mesh.geometry

    // 获取面索引(indices)和顶点位置(position)的属性
    const indices = geometry.index
    const positions = geometry.attributes.position
    console.log('indices :>> ', indices)

    // 假设你想要计算索引为0的面的法向量
    const a = new THREE.Vector3()
    const b = new THREE.Vector3()
    const c = new THREE.Vector3()
    console.log('faceIndex :>> ', faceIndex)

    // 第一个顶点
    // face.a
    // console.log('indices.getX(3 * faceIndex) :>> ', indices.array[faceIndex * 3])
    // console.log('indices.getX(3 * faceIndex) :>> ', indices.getX(3 * faceIndex))
    // 第二个顶点
    // face.b
    // console.log('indices.getX(3 * faceIndex) :>> ', indices.array[faceIndex * 3 +1 ])
    // console.log('indices.getX(3 * faceIndex) :>> ', indices.getX(3 * faceIndex + 1 ))  //连续顶点可以
    // console.log('indices.getX(3 * faceIndex) :>> ', indices.getY(3 * faceIndex))

    // 第三个顶点
    //1. face.c
    //2. console.log('indices.getX(3 * faceIndex) :>> ', indices.array[faceIndex * 3 +2])
    //3. console.log('indices.getX(3 * faceIndex) :>> ', indices.getX(3 * faceIndex + 2 ))  //连续顶点可以
    //4. console.log('indices.getX(3 * faceIndex) :>> ', indices.getZ(3 * faceIndex))

    // 获取面的三个顶点的位置
    a.fromBufferAttribute(positions, face.a)
    b.fromBufferAttribute(positions, face.b)
    c.fromBufferAttribute(positions, face.c)
    console.log('a :>> ', a)
    console.log('b :>> ', b)
    console.log('c :>> ', c)

    // 计算面的法向量
    const faceNormal = new THREE.Vector3()
    faceNormal.crossVectors(b.sub(a), c.sub(a))

    // 归一化法向量
    faceNormal.normalize()

    return faceNormal
  }
使用面向对象的思想封装
- 创建一个创建scene
- 把需要添加的物体、灯光、等添加进去
- 创建摄像机 camera,添加到场景中
- 视锥体 角度 长宽比 近端面 远端面
- 创建一个渲染器,渲染这个场景,每次改动都需要重新渲染
import type { Curve, Group, Scene } from 'three'
import {
  BufferGeometry,
  Vector3,
  CurvePath,
  BufferAttribute,
  CatmullRomCurve3,
  Line,
  LineBasicMaterial,
  QuadraticBezierCurve3,
  MeshStandardMaterial,
  Mesh,
  BoxGeometry,
} from 'three'
import { MAX_POINTS, THREE_MODEL_TYPE_CURVE, ARC_SEGMENTS } from '@/constant/index'
import { genUUID } from '@/utils'

interface CurveObejct {
  mesh: Line
  curve: Curve<Vector3> | CurvePath<Vector3>
  guid: string
  drawVector: Vector3[] //线段端点矢量
  drawPoints: Mesh[] //线段端点对象
  controlPoints: Mesh[] //贝塞尔曲线的控制点
  scenerysObjects: Group[] //配景的对象
  scenerysOrigin: Group[] //配景组
  type: string //应该允许2种类型,样条曲线和贝塞尔曲线
  lineColor: number //线段颜色
  endPointColor: number //端点颜色
  controlPointColor: number //控制点颜色
  linewidth: number //线段宽度
  curveLens: number
  scenerySpace: number
}

/*
曲线对象的设计
1. 包含所有的必要数据,可以通过私有的数据操作曲线
2. 分离操作 - 类方法
3. 公共数据  包含scene 公共的属性
4. 私有数据 线段的信息

操作曲线的过程:
一、生成曲线
1. 生成一曲线
2. 从曲线中获取一些点
3. 根据这些点,去生成一条几何线段,以及线段端点、控制点
4. 从线段中获取均分点坐标,把配景放置在上面
5. 监听页面上的点击事件,如果点击的是控制点,则可进行对应操作
6. 结束绘制曲线,保存曲线对应的所有数据到userData中

二、更新线段
1. 拖拽控制点或者端点,触发曲线更新-->需要补充一些操作时的高亮
2. 根据新的曲线获取点来更新线段端点和控制点
3. 更新配景位置,以及数量(多了隐藏,少了补充)

三、变换曲线类型
1. 保持点不变
2. 根据点坐标,生成指定类型的曲线
3. 从曲线上获取相应的点,生成端点和控制点
4. 放置配景

四、配景的操作
成组操作配景的变换(移动-缩放-旋转)

脱离组,单独自由变换配景 -限制移动路径
脱离组,单独自由变换配景 -无限制

*/

export class DrawCurve {
  static pointSize: number = 400
  static geometry: BoxGeometry = new BoxGeometry(this.pointSize, this.pointSize, this.pointSize)
  static scene: Scene = null //传进来的scene
  static curveObject: CurveObejct = null

  static setScene(scene: Scene) {
    if (!this.scene) {
      this.scene = scene
    }
  }
  static setFromExists(object: CurveObejct) {
    this.curveObject = object
  }

  static getCurveObject(): CurveObejct {
    return this.curveObject
  }

  // 开始绘制一条新的线段
  static new({ type = 'spline', lineColor = 0xff0000, endPointColor = 0xff00ff, controlPointColor = 0xffff00, linewidth = 8, scenerySpace = 4000 }) {
    const curveObject: CurveObejct = {
      curve: null,
      mesh: null,
      controlPointColor,
      controlPoints: [],
      guid: genUUID(),
      drawVector: [],
      drawPoints: [],
      scenerysObjects: [],
      scenerysOrigin: [],
      type,
      lineColor,
      endPointColor,
      linewidth,
      curveLens: 0,
      scenerySpace,
    }
    this.curveObject = curveObject
  }

  //初始化一条新线段
  static initCurve() {
    const geometry = new BufferGeometry()
    geometry.setAttribute('position', new BufferAttribute(new Float32Array(MAX_POINTS * 3), 3)) // 预先设置了线段的点
    if (this.curveObject.type === 'spline') {
      this.curveObject.curve = new CatmullRomCurve3(this.curveObject.drawVector, false, 'catmullrom', 0.5)
    } else {
      this.curveObject.curve = new CurvePath<Vector3>()
    }
    this.curveObject.mesh = new Line(
      geometry.clone(),
      new LineBasicMaterial({
        color: this.curveObject.lineColor,
        linewidth: 4,
      })
    )
    this.curveObject.mesh.castShadow = true
    this.curveObject.mesh.visible = true
    this.scene.add(this.curveObject.mesh) //添加到组内
  }

  // 样条曲线
  static initSpline() {}

  // 贝塞尔曲线
  static addBezierCurve() {
    const lens = this.curveObject.drawVector.length
    if (lens < 2) return
    const startPoint = this.curveObject.drawVector[lens - 2] //起点
    const endPoint = this.curveObject.drawVector[lens - 1] //终点
    const cPoint = new Vector3((startPoint.x + endPoint.x) / 2, (startPoint.y + endPoint.y) / 2, (startPoint.z + endPoint.z) / 2) //控制点
    const object = this.addPointToScene(cPoint, this.curveObject.controlPointColor) //把控制点添加到场景中
    this.curveObject.controlPoints.push(object) //保存控制点对象
    const curve1 = new QuadraticBezierCurve3(startPoint, object.position, endPoint) //创建曲线
    if (this.curveObject.curve instanceof CurvePath) {
      this.curveObject.curve.add(curve1) //添加曲线
    }
  }

  //添加点到场景中
  static addPointToScene(point: Vector3, color = this.curveObject.endPointColor) {
    const material = new MeshStandardMaterial({ color }) //创建一个立方体点
    const object = new Mesh(this.geometry.clone(), material)

    object.position.copy(point) //放置到传入的位置
    object.castShadow = true
    object.receiveShadow = true
    object.userData = {
      type: THREE_MODEL_TYPE_CURVE,
      guid: this.curveObject.guid,
    }
    this.scene.add(object) //把点添加到场景中
    return object
  }

  // 添加点
  static addPoint(pos: Vector3) {
    const object = this.addPointToScene(pos) //创建一个点并添加到场景中
    this.curveObject.drawVector.push(object.position) //保存这个点的位置到数组中
    this.curveObject.drawPoints.push(object) //保存这个点对象到线段的数组中
    // 如果是贝塞尔曲线,还要添加一条线段
  }

  // 删除点
  static delPoint(object: Mesh) {
    this.scene.remove(object)
    const vector3Index = this.curveObject.drawVector.findIndex(obj => obj.equals(object.position))
    const pointIndex = this.curveObject.drawPoints.findIndex(obj => object.uuid == obj.uuid)
    // 删除哪个点
    vector3Index && this.curveObject.drawVector.splice(vector3Index, 1)
    pointIndex && this.curveObject.drawPoints.splice(pointIndex, 1)
  }

  // 更新曲线
  static updateCurve() {
    const spline = this.curveObject.curve
    const position = this.curveObject.mesh.geometry.attributes.position
    let point = new Vector3()
    for (let i = 0; i < ARC_SEGMENTS; i++) {
      const t = i / (ARC_SEGMENTS - 1)
      spline.getPoint(t, point)
      position.setXYZ(i, point.x, point.y + this.curveObject.linewidth * 2, point.z)
    }
    spline.updateArcLengths()
    this.curveObject.curveLens = spline.getLength()
    position.needsUpdate = true
    point = null
  }

  //画线流程
  static draw(pos: Vector3) {
    this.addPoint(pos)
    const lens = this.curveObject.drawVector.length

    if (lens === 2) {
      // 有2个点初始化线条
      this.initCurve()
    }

    if (lens > 1 && this.curveObject.curve) {
      // 新增的点
      this.updateCurve() //更新曲线的mesh
      this.updateScenerys() //更新配景

      //贝塞尔曲线
      if (this.curveObject.type == 'bezier') {
        this.addBezierCurve()
      }
    }
  }

  //结束画线
  static drawEnd() {
    const userData = {
      [this.curveObject.guid]: this.curveObject,
    }
    this.curveObject = null
    return userData
  }

  // 更新配景
  static updateScenerys() {
    if (this.curveObject.scenerysOrigin.length === 0) return
    const divisions = Math.floor(this.curveObject.curveLens / this.curveObject.scenerySpace)
    const positions = this.curveObject.curve.getSpacedPoints(divisions)
    positions.forEach((pos, index) => {
      // 原来的列表中就有配景
      if (this.curveObject.scenerysObjects[index]) {
        const object = this.curveObject.scenerysObjects[index]
        object.position.set(pos.x, pos.y, pos.z)
        object.visible = true
      } else {
        // 原来的配景不够,需要新增配景,按顺序取配景组中的配景对象
        const oIndex = index % this.curveObject.scenerysOrigin.length
        const object = this.curveObject.scenerysOrigin[oIndex].clone()
        object.position.set(pos.x, pos.y, pos.z)
        this.scene.add(object)
        this.curveObject.scenerysObjects.push(object)
      }
    })
    // 原有的配景超过了现需要的配景,隐藏配景,在编辑结束的时候去删除它
    const extLen = this.curveObject.scenerysObjects.length - positions.length
    if (extLen > 0) {
      for (let i = 0; i < extLen; i++) {
        this.curveObject.scenerysObjects[positions.length + i].visible = false
      }
    }
  }

  // 添加一个配景
  static addScenery(object: Group) {
    this.curveObject.scenerysOrigin.push(object)
  }
  // 切换曲线的类型
  static switchCurve() {}
}
变换控制器无法拖动的原因
- 模型尺寸过大,导致拖动的距离不明显,肉眼看不出变化,常见隐秘的bug
Raycaster
raycaster射线与mesh交点的法线是通过插值得来,是mesh本地空间法线,如果要判断方向,需要转换到世界空间,或者把世界空间的方向转换到mesh的本地空间
batchedMesh
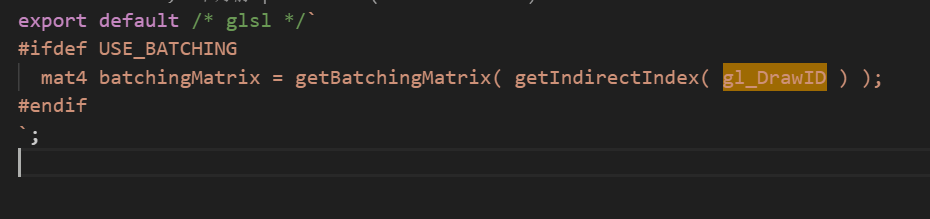
batchedMesh是如何实现使用同一个material,但是每个物体单独应用一个矩阵的?
- 使用一个dataTexture存储矩阵数据
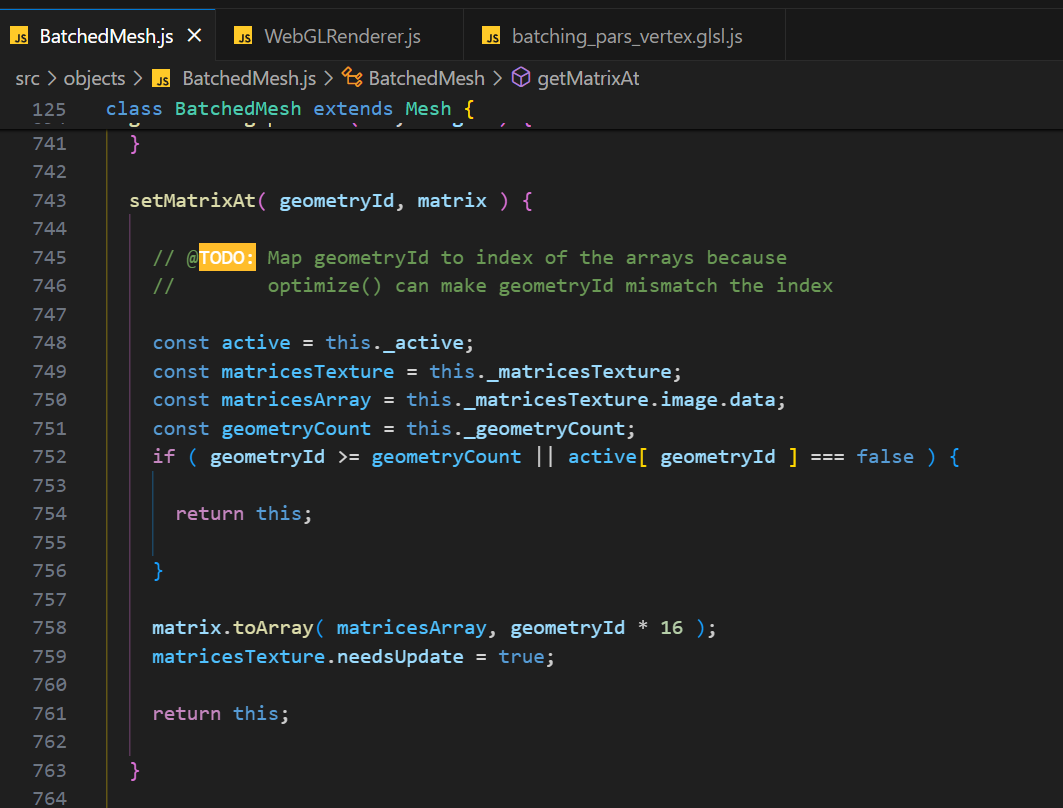
- 在WebGLRenderer中把纹理设置到uniform中
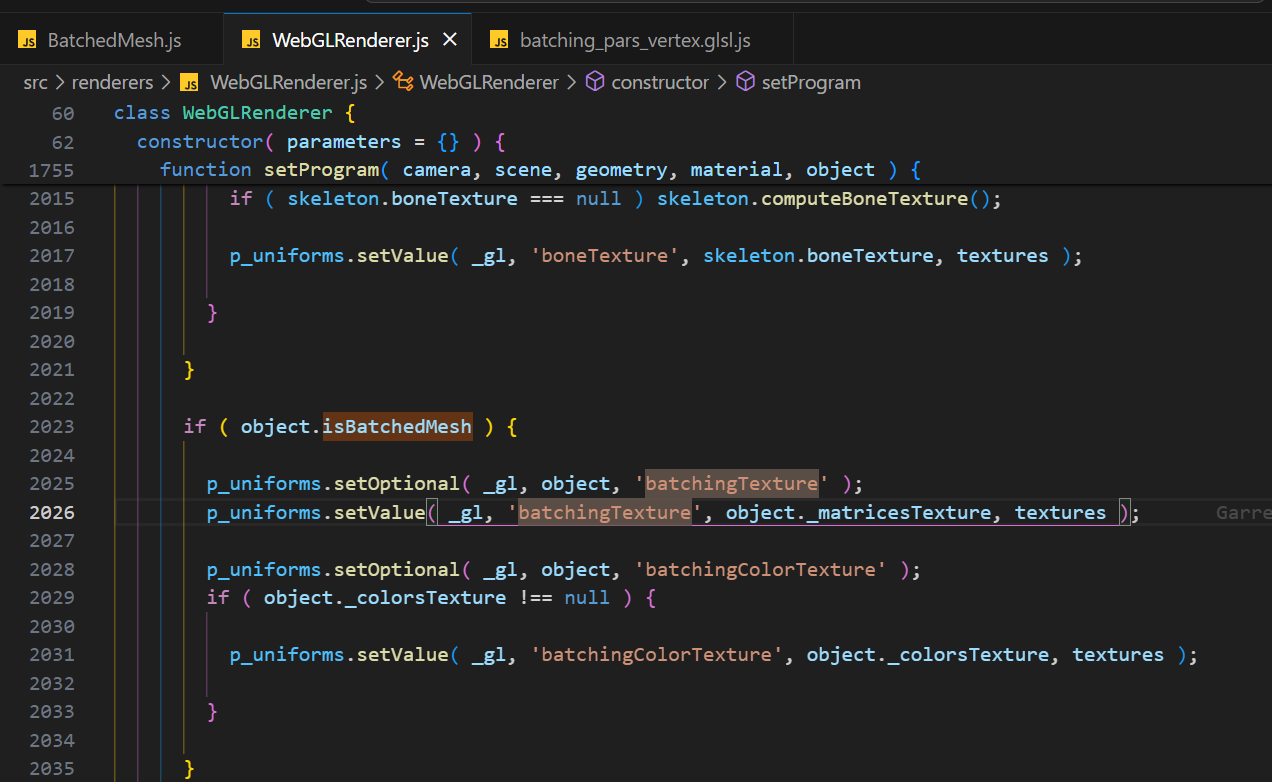
- 在顶点着色器中去获取纹理,并定义一个解析矩阵的函数
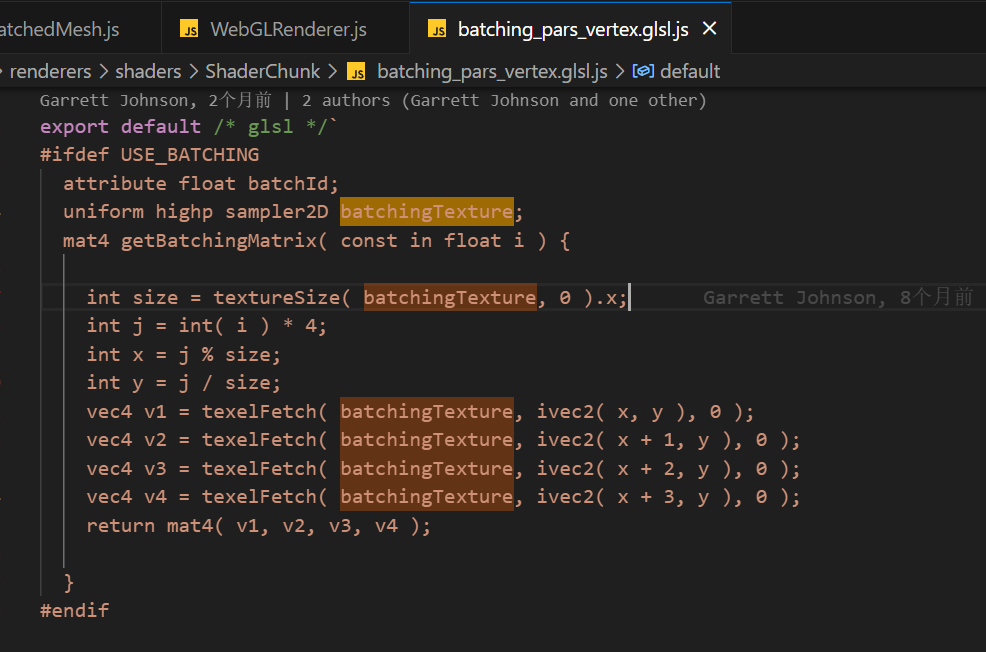
- 在顶点着色器中去使用 (threejs r165)
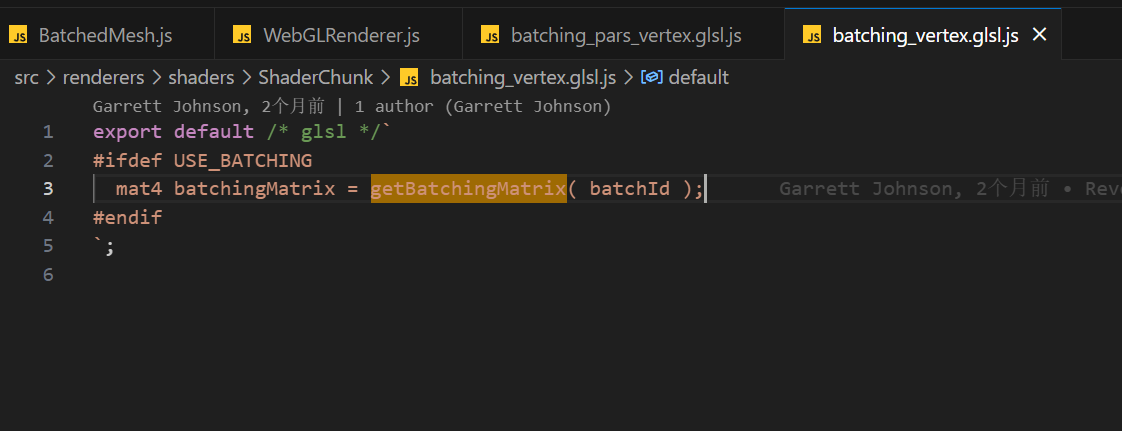
r166 已修改为内置的变量 gl_DrawID
两个对比的ppt
https://on-demand.gputechconf.com/gtc/2013/presentations/S3032-Advanced-Scenegraph-Rendering-Pipeline.pdf
https://on-demand.gputechconf.com/siggraph/2014/presentation/SG4117-OpenGL-Scene-Rendering-Techniques.pdf
标准化UV
- 原理简述;假设是一个规则的图形,那么去找到uv的四个顶点,然后以uv范围,把全部uv坐标初始化到0~1范围内,然后找到uv坐标最值对应的顶点,用顶点的坐标来计算图形的边长
function standardizeUVs(geometry: THREE.BufferGeometry) {
  if (!geometry.attributes.uv || !geometry.attributes.position) {
    console.error('Geometry does not have UV or position attributes');
    return null;
  }

  const uvs = geometry.attributes.uv;
  const positions = geometry.attributes.position;
  const uvArray = uvs.array;

  // Find min and max UV coordinates
  let minU = Infinity, minV = Infinity;
  let maxU = -Infinity, maxV = -Infinity;
  let minUIndex = -1, minVIndex = -1, maxUIndex = -1, maxVIndex = -1;

  for (let i = 0; i < uvArray.length; i += 2) {
    const u = uvArray[i];
    const v = uvArray[i + 1];

    if (u < minU) {
      minU = u;
      minUIndex = i / 2;
    }
    if (v < minV) {
      minV = v;
      minVIndex = i / 2;
    }
    if (u > maxU) {
      maxU = u;
      maxUIndex = i / 2;
    }
    if (v > maxV) {
      maxV = v;
      maxVIndex = i / 2;
    }
  }
  // Calculate range
  const rangeU = maxU - minU;
  const rangeV = maxV - minV;

  // Normalize UV coordinates
  for (let i = 0; i < uvArray.length; i += 2) {
    uvArray[i] = (uvArray[i] - minU) / rangeU;
    uvArray[i + 1] = (uvArray[i + 1] - minV) / rangeV;
  }

  uvs.needsUpdate = true;

  // Get vertex positions for the extreme points
  const minUPos = new THREE.Vector3().fromBufferAttribute(positions, minUIndex);
  const maxUPos = new THREE.Vector3().fromBufferAttribute(positions, maxUIndex);
  const minVPos = new THREE.Vector3().fromBufferAttribute(positions, minVIndex);
  const maxVPos = new THREE.Vector3().fromBufferAttribute(positions, maxVIndex);

  // Calculate max edge lengths in XY plane
  const xEdgeLength = Math.sqrt(
    Math.pow(maxUPos.x - minUPos.x, 2) +
    Math.pow(maxUPos.y - minUPos.y, 2)
  );
  const yEdgeLength = Math.sqrt(
    Math.pow(maxVPos.x - minVPos.x, 2) +
    Math.pow(maxVPos.y - minVPos.y, 2)
  );

  return {
    maxEdges: {
      x: xEdgeLength,
      y: yEdgeLength
    }
  };
}
贝塞尔曲线路径绘制
使用贝塞尔曲线绘制有宽度的路面
 import * as THREE from 'three';
        import { OrbitControls } from 'three/addons/controls/OrbitControls.js';
        import { TransformControls } from 'three/addons/controls/TransformControls.js';

    let scene, camera, renderer, orbitControls;
    let curvePath = new THREE.CurvePath();
    let roadMesh;
    let pointsGroup = new THREE.Group();
    let transformControl;

    const pointArr = []
    const cubeArr =[]
    const controlArr= []
    const ROAD_WIDTH = 5;
    const SMOOTHNESS = 20;
    const POINT_SIZE = 0.5;
    const CONTROL_POINT_OFFSET = 0.4;

    function init() {
        scene = new THREE.Scene();
        camera = new THREE.PerspectiveCamera(75, window.innerWidth / window.innerHeight, 0.1, 1000);
        renderer = new THREE.WebGLRenderer();
        renderer.setSize(window.innerWidth, window.innerHeight);
        document.body.appendChild(renderer.domElement);

        camera.position.set(0, 50, 50);
        camera.lookAt(0, 0, 0);

        orbitControls = new OrbitControls(camera, renderer.domElement);

        transformControl = new TransformControls(camera, renderer.domElement);
        transformControl.addEventListener('dragging-changed', function (event) {
            orbitControls.enabled = !event.value;
        });
        transformControl.addEventListener('objectChange', updateRoadFromPoints);
        scene.add(transformControl);

        const gridHelper = new THREE.GridHelper(100, 100);
        scene.add(gridHelper);

        scene.add(pointsGroup);

        renderer.domElement.addEventListener('click', onMouseClick, false);

        animate();
    }

    function onMouseClick(event) {
        if (transformControl.object) return; // Don't add new points if we're moving one

        const mouse = new THREE.Vector2();
        mouse.x = (event.clientX / window.innerWidth) * 2 - 1;
        mouse.y = -(event.clientY / window.innerHeight) * 2 + 1;

        const raycaster = new THREE.Raycaster();
        raycaster.setFromCamera(mouse, camera);

        const plane = new THREE.Plane(new THREE.Vector3(0, 1, 0), 0);
        const intersectionPoint = new THREE.Vector3();
        raycaster.ray.intersectPlane(plane, intersectionPoint);

        addPointToRoad(intersectionPoint);
    }

    function addPointToRoad(point) {
      pointArr.push(point) // 添加点
      const cube = createPointCube(point);
      pointsGroup.add(cube);
      if(pointArr.length > 1){
        const lastPoint = pointArr[pointArr.length-2]
        const midPoint = new THREE.Vector3().addVectors(lastPoint, point).multiplyScalar(0.5);
        curvePath.add(new THREE.QuadraticBezierCurve3(lastPoint, midPoint, point));
        const newControlCube = createPointCube(midPoint, 0x00ff00);
        controlArr.push(newControlCube)
        pointsGroup.add(newControlCube);

        if (curvePath.curves.length > 1) {
          // 计算上一条曲线的控制点的偏移
          const lastCurve = curvePath.curves[curvePath.curves.length - 2];
          const tangent = lastCurve.getTangent(0.5)
          const normal = new THREE.Vector3().crossVectors( new THREE.Vector3(0,1,0),tangent ).normalize()

          // Calculate the direction and normal
          const direction = new THREE.Vector3().subVectors(point, lastPoint).normalize()
          const dot = direction.dot(normal)
          if(dot > 0){
            normal.negate()
          }

          // const normal = new THREE.Vector3(direction.z, 0, direction.x);

          // Calculate control points

          const distance = lastPoint.distanceTo(point);
          const offset = normal.multiplyScalar(distance * CONTROL_POINT_OFFSET);
          const lastControlPoint = new THREE.Vector3().addVectors(lastCurve.v1, offset);
          // Adjust the last curve's control point
          if (lastCurve instanceof THREE.QuadraticBezierCurve3) {
              lastCurve.v1.copy(lastControlPoint);
              updateControlPointVisual(curvePath.curves.length - 2);
          }
        }
      }

    updateRoadGeometry();
}

    function createPointCube(position, color = 0xff0000) {
        const geometry = new THREE.BoxGeometry(POINT_SIZE, POINT_SIZE, POINT_SIZE);
        const material = new THREE.MeshBasicMaterial({ color: color });
        const cube = new THREE.Mesh(geometry, material);
        cube.position.copy(position);

        cube.userData.isControlPoint = color === 0x00ff00;

        cube.addEventListener('click', function(event) {
            event.stopPropagation();
            transformControl.attach(this);
            scene.add(transformControl);
        });

        return cube;
    }

    function updateControlPointVisual(curveIndex) {
    const curve = curvePath.curves[curveIndex];
    if (curve instanceof THREE.QuadraticBezierCurve3) {
        const controlPoint = controlArr[curveIndex]
        if (controlPoint && controlPoint.userData.isControlPoint) {
            controlPoint.position.copy(curve.v1);
        }
    }
}

    function updateRoadFromPoints() {
        curvePath = new THREE.CurvePath();
        const points = pointsGroup.children;

        for (let i = 0; i < points.length - 1; i += 2) {
            const startPoint = points[i].position;
            const endPoint = points[i + 2] ? points[i + 2].position : startPoint;
            const controlPoint = points[i + 1].position;

            curvePath.add(new THREE.QuadraticBezierCurve3(startPoint, controlPoint, endPoint));
        }

        updateRoadGeometry();
    }

    function updateRoadGeometry() {
        if (roadMesh) {
            scene.remove(roadMesh);
        }

        const roadGeometry = new THREE.BufferGeometry();
        const positions = [];
        const normals = [];
        const uvs = [];

        const points = curvePath.getPoints(SMOOTHNESS * curvePath.curves.length);

        for (let i = 0; i < points.length; i++) {
            const current = points[i];
            const next = points[Math.min(i + 1, points.length - 1)];

            const tangent = new THREE.Vector3().subVectors(next, current).normalize();
            tangent.y = 0;

            const normal = new THREE.Vector3(-tangent.z, 0, tangent.x).normalize();

            const leftEdge = new THREE.Vector3().addVectors(current, normal.clone().multiplyScalar(ROAD_WIDTH / 2));
            const rightEdge = new THREE.Vector3().addVectors(current, normal.clone().multiplyScalar(-ROAD_WIDTH / 2));

            positions.push(leftEdge.x, leftEdge.y, leftEdge.z);
            positions.push(rightEdge.x, rightEdge.y, rightEdge.z);

            normals.push(0, 1, 0, 0, 1, 0);

            uvs.push(0, i / (points.length - 1));
            uvs.push(1, i / (points.length - 1));
        }

        const indices = [];
        for (let i = 0; i < points.length - 1; i++) {
            const baseIndex = i * 2;
            indices.push(baseIndex, baseIndex + 2, baseIndex + 1);
            indices.push(baseIndex + 2, baseIndex + 3, baseIndex + 1);
        }

        roadGeometry.setAttribute('position', new THREE.Float32BufferAttribute(positions, 3));
        roadGeometry.setAttribute('normal', new THREE.Float32BufferAttribute(normals, 3));
        roadGeometry.setAttribute('uv', new THREE.Float32BufferAttribute(uvs, 2));
        roadGeometry.setIndex(indices);

        const roadMaterial = new THREE.MeshBasicMaterial({ color: 0x808080 });
        roadMesh = new THREE.Mesh(roadGeometry, roadMaterial);
        scene.add(roadMesh);
    }

    function animate() {
        requestAnimationFrame(animate);
        renderer.render(scene, camera);
    }

    init();
为什么相机的matrixWorldInverse 就是视图矩阵 view matrix?
因为相机(或者任何物体的)的matrixWorld都是把本地空间的坐标转换到世界空间,其逆矩阵就是把世界空间的坐标转换到本地空间中去,所以具体到相机, matrixWorldInverse就是把世界空间的坐标转换到相机空间中去,那就是视图矩阵